Most people try to learn Industrial Cybersecurity by reading standards like IEC 62443 or watching PowerPoint presentations. But if you want to actually understand how to defend (or attack) a factory, you need to get your hands dirty. You need a target.
Real PLCs are expensive, and breaking them can cost thousands.
In this guide, I will show you how to build a professional-grade Industrial Control System (ICS) Lab completely from scratch using free, open-source tools. We will architect a secure, air-gapped network that mimics a real factory environment using OpenPLC (The Brain) and FUXA (The Eyes).
The Lab Architecture (The Purdue Model)
Before we install anything, we need to understand the map. We aren't just spinning up Virtual Machines; we are building a vertical slice of the Purdue Model—the industry standard for ICS network segmentation.
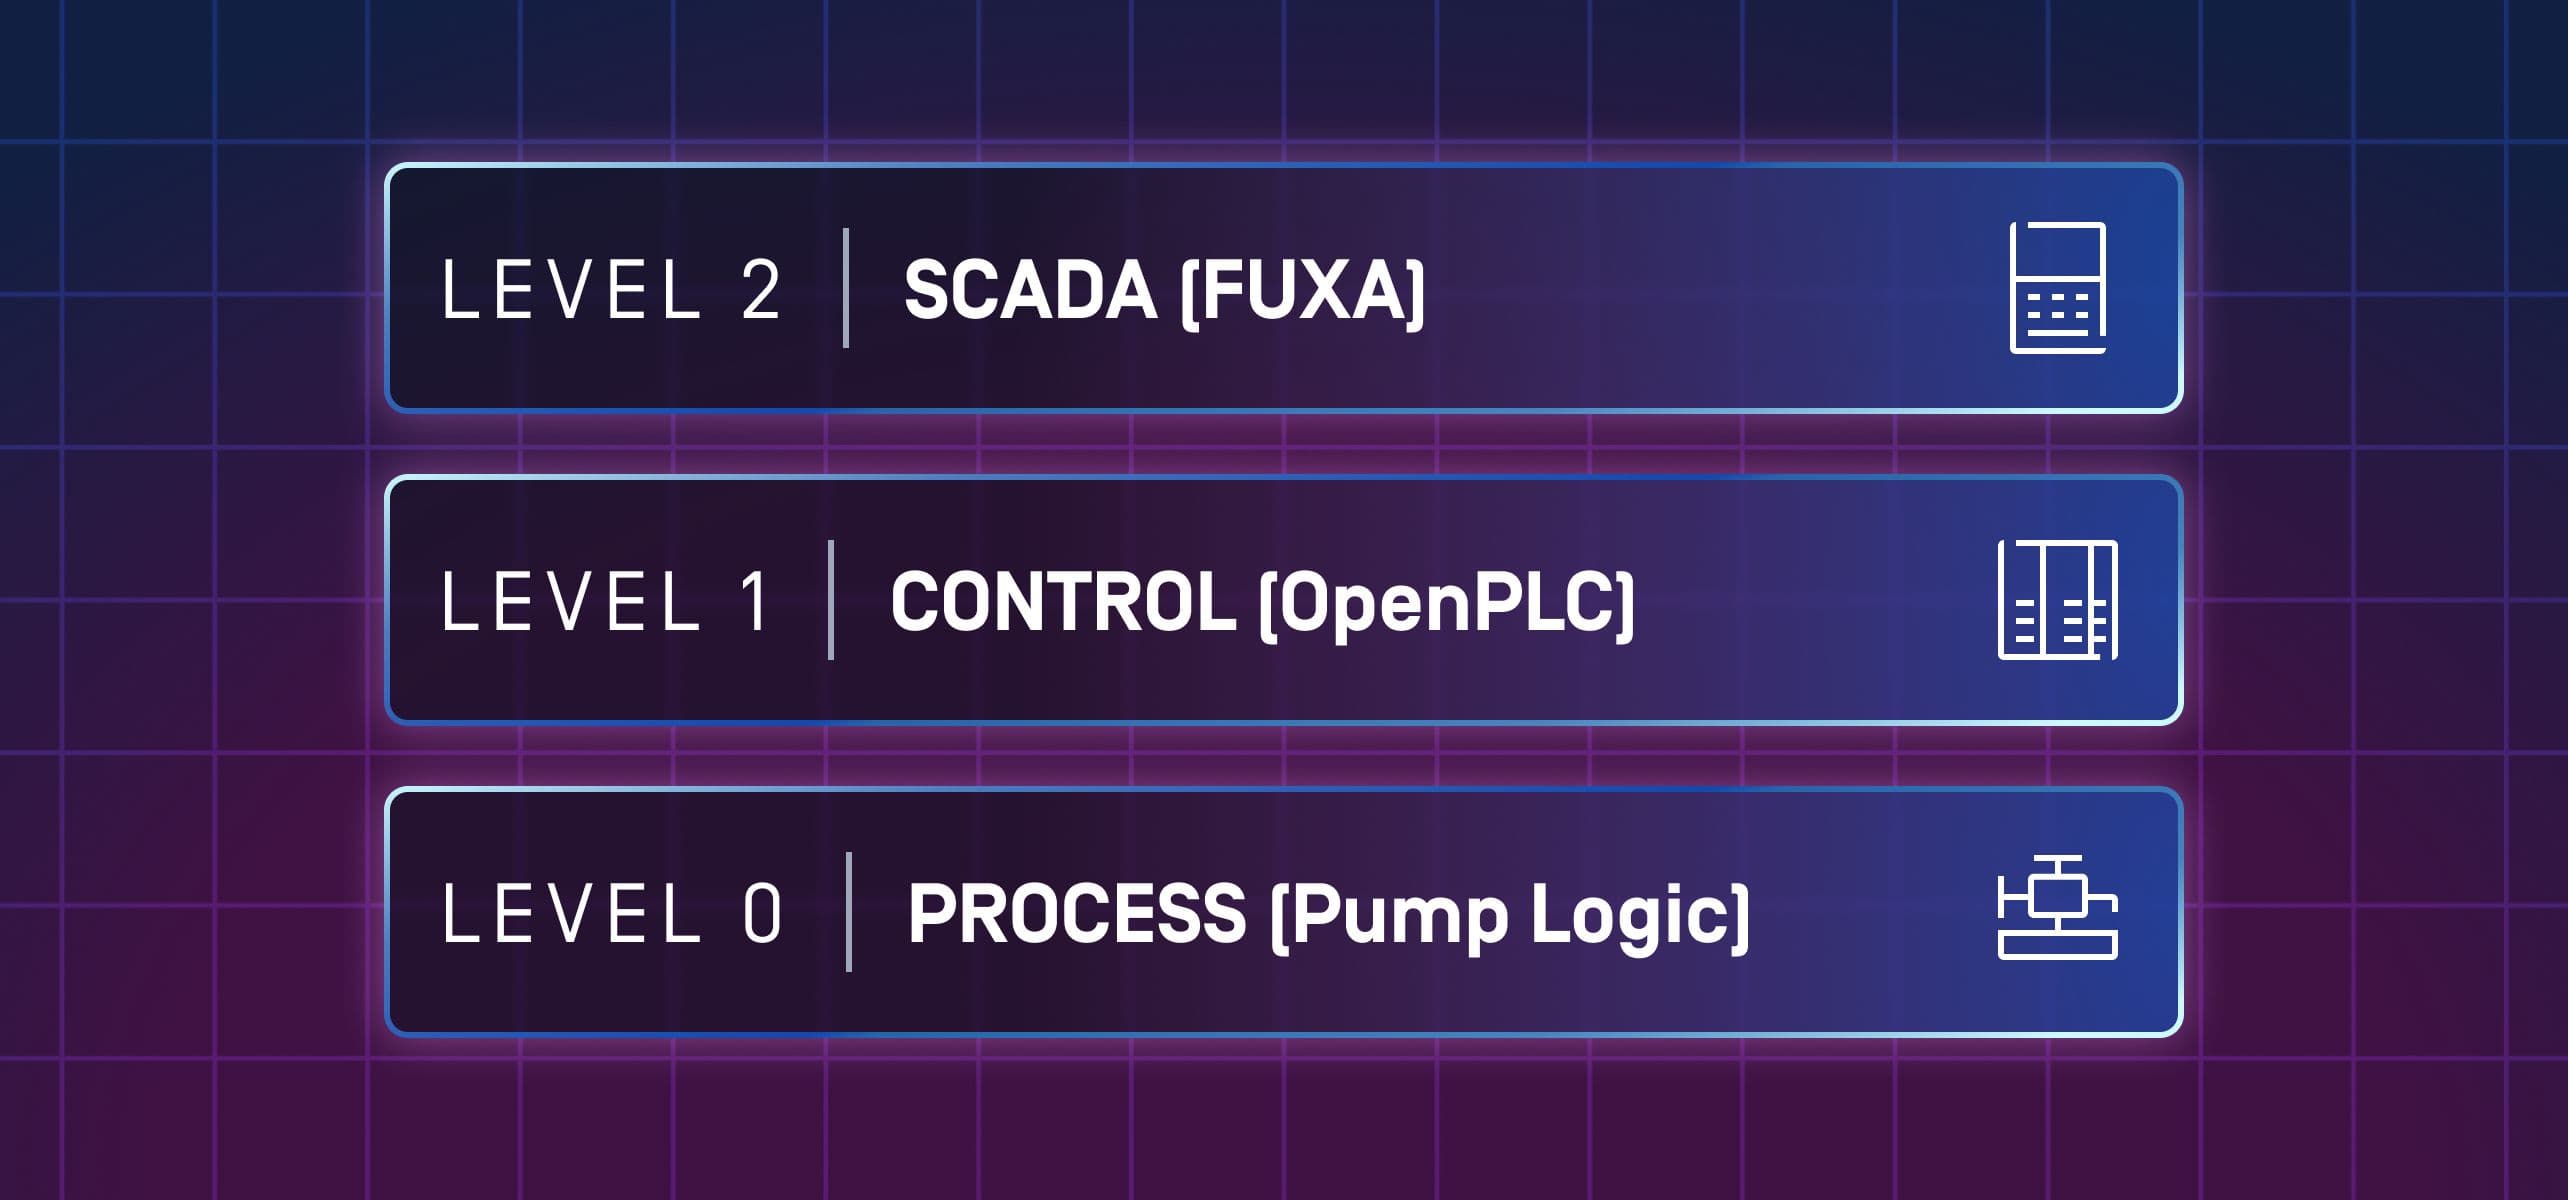
In our lab, we are simulating three distinct levels on a single machine:
- Level 2 (Supervisory): This is FUXA, our SCADA system. It runs in a Docker container and acts as the operator interface.
- Level 1 (Control): This is OpenPLC, the controller that makes decisions.
- Level 0 (Physical): This is our Ladder Logic code, representing the physical pump and sensors.
To secure this, we split our environment into two zones:
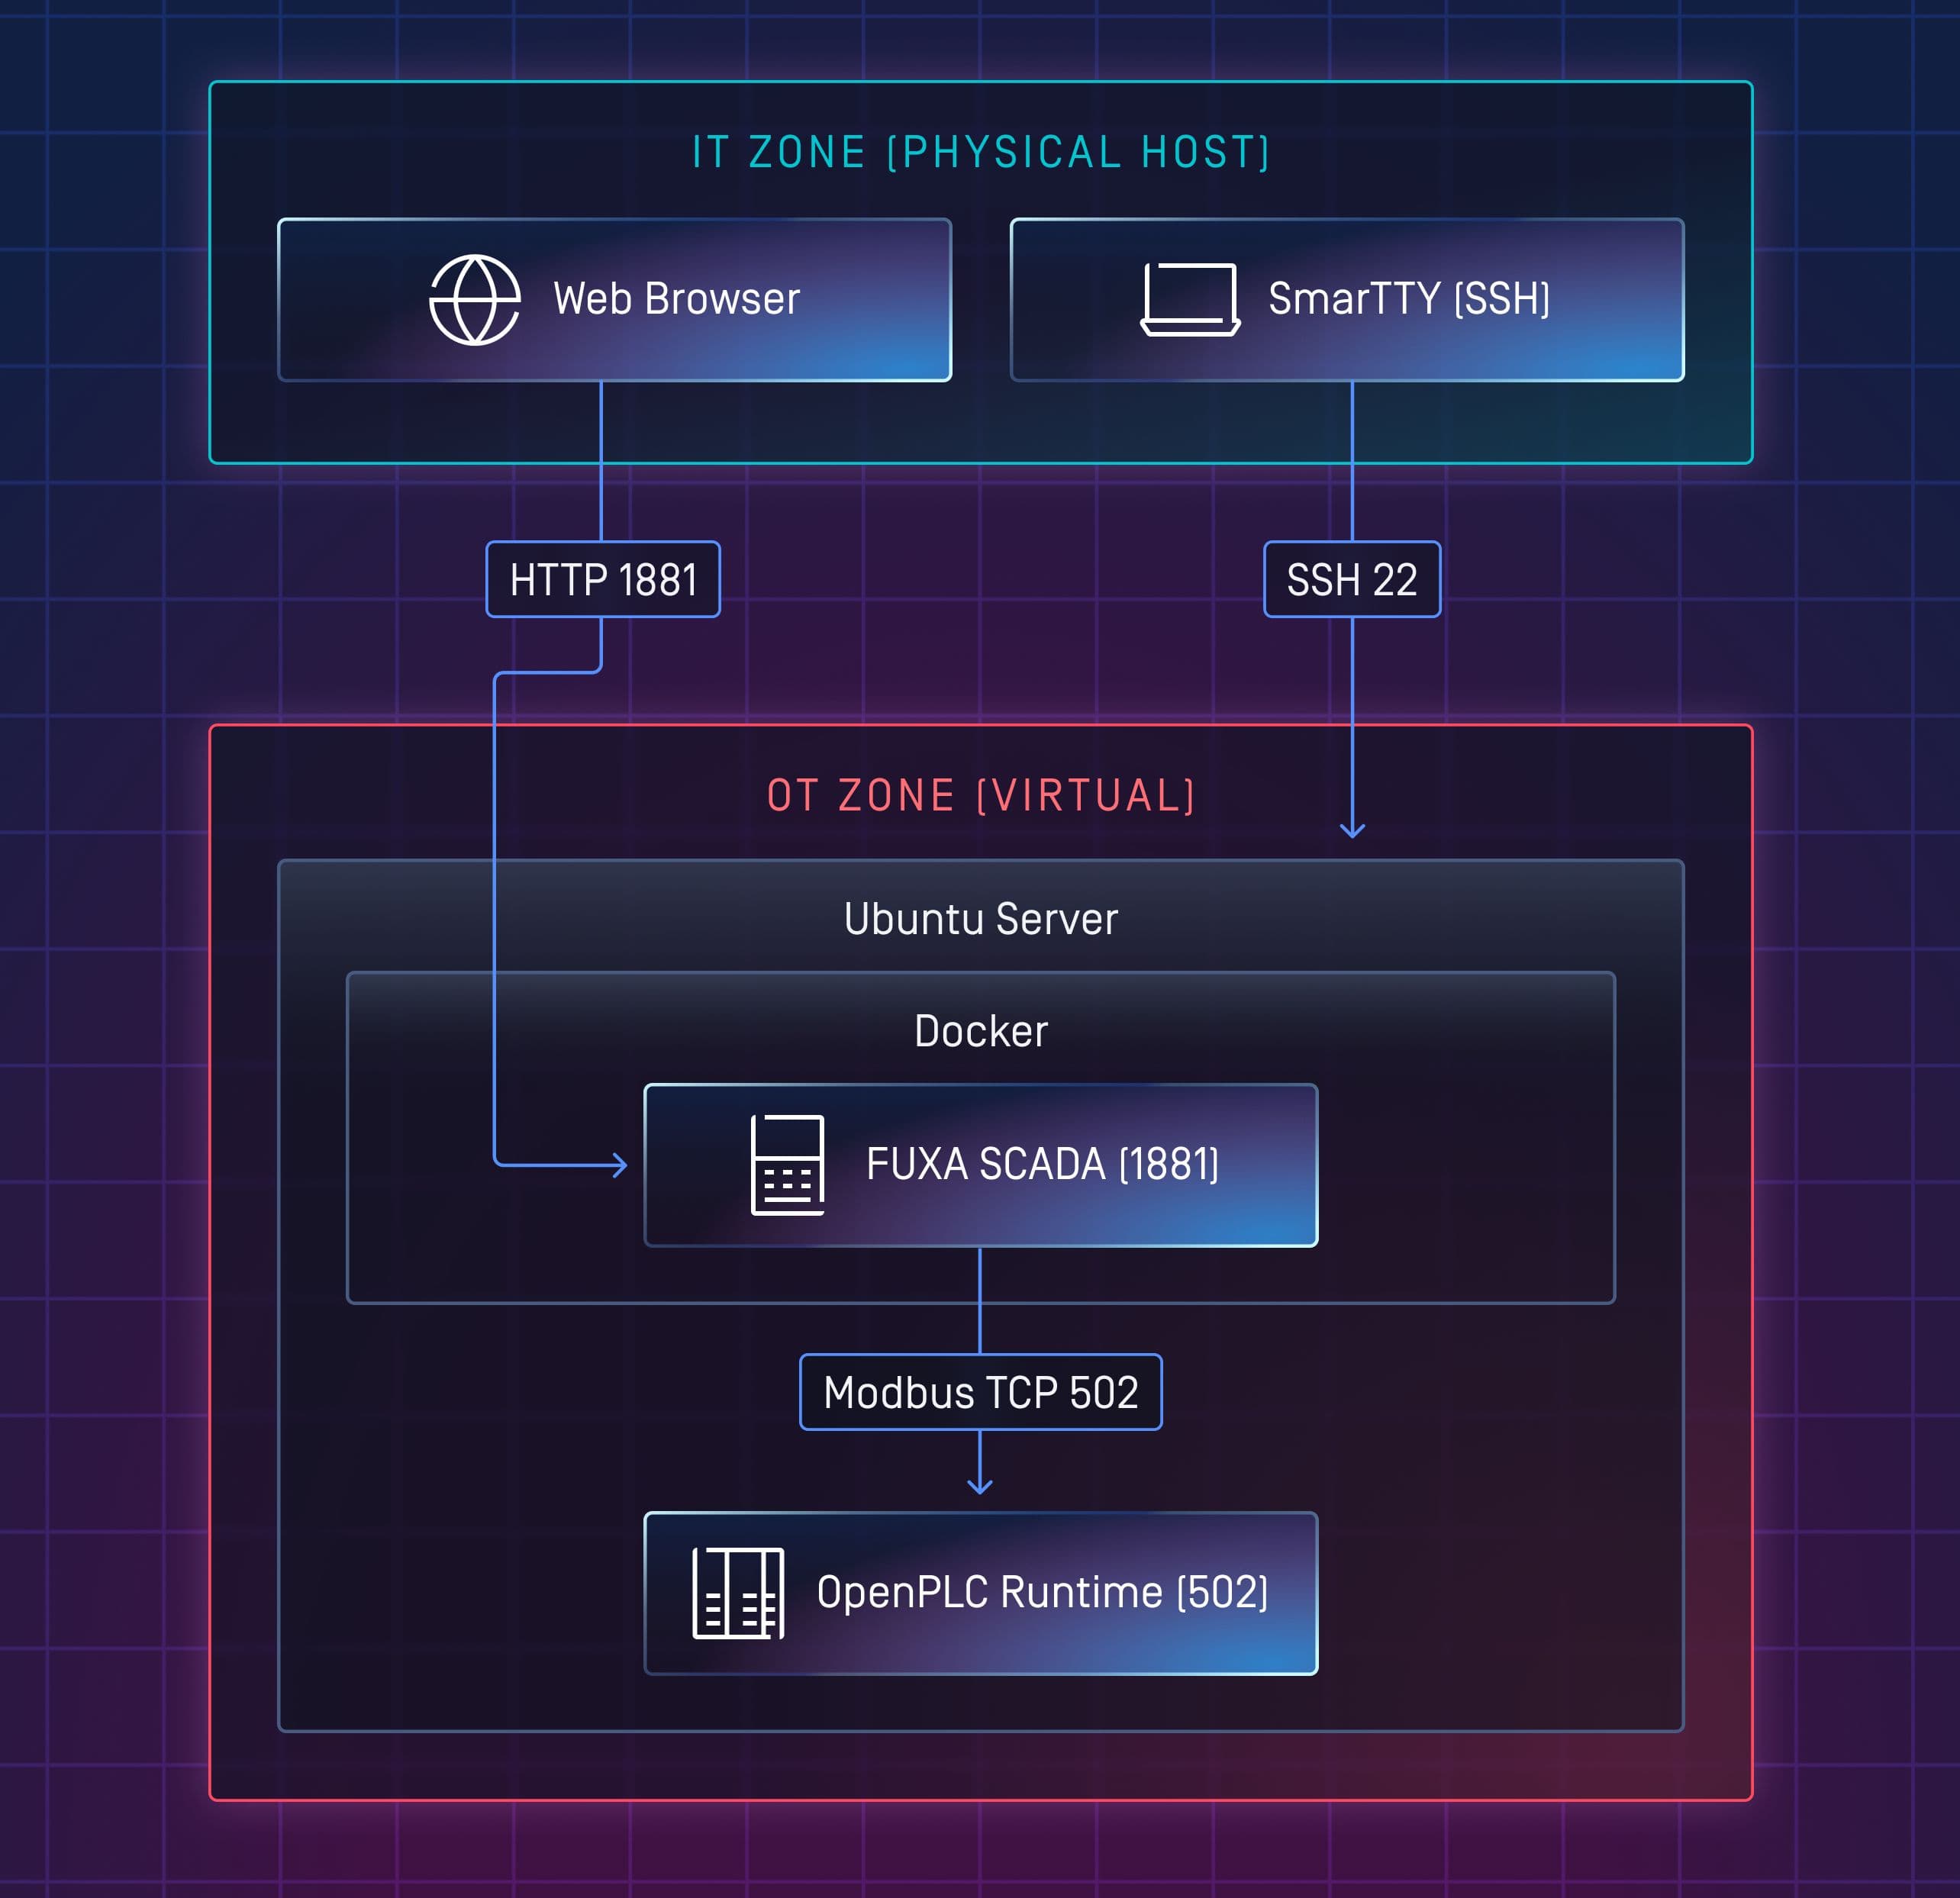
- IT Zone (Your Host PC): The Engineering Workstation. We manage the system via SSH from here.
- OT Zone (The VM): The "Factory Floor." It lives at the static IP 192.168.56.50 and is strictly isolated.
Step 1: The Network Foundation (VirtualBox)
To simulate a real OT environment, we cannot use DHCP. Industrial equipment requires static, predictable IP addresses.
- Open VirtualBox.
- Go to Tools -> Network Manager.
- Create a Host-Only Network.
- Name: vboxnet0
- IPv4 Address: 192.168.56.1
- DHCP Server:Unchecked (Disabled)
Next, create a new Ubuntu Server VM. In the Network Settings, configure two adapters:
- Adapter 1: NAT [Temporary internet access for downloads].
- Adapter 2: Host-Only Adapter (vboxnet0) [Our permanent OT link].
Step 2: Commissioning the Controller
Install Ubuntu Server 22.04 on your VM. Once installed, we need to assign it a permanent identity on the OT network.
1. Install SSH
We want to leave the clumsy VirtualBox console immediately. Install SSH so we can manage the server from our Host PC.
sudo apt update

sudo apt install openssh-server -y

sudo systemctl enable ssh

sudo systemctl start ssh
2. Configure the Static IP (Netplan)
We bind our physical network card to the IP 192.168.56.50.
Edit the config:
sudo nano /etc/netplan/00-installer-config.yaml

network:
  version: 2

  ethernets:
    enp0s3:
      dhcp4: true

    enp0s8:
      dhcp4: no
      addresses:
        - 192.168.56.50/24
Apply the changes (and fix permissions to avoid warnings):
sudo chmod 600 /etc/netplan/00-installer-config.yaml
sudo netplan apply
Step 3: Installing "The Brain" (OpenPLC)
Switch to your SSH client (connect to 192.168.56.50). We will install OpenPLC Runtime, which listens on Port 502 (Modbus TCP).
sudo apt install git python3-pip -y
git clone
https://github.com/thiagoralves/OpenPLC_v3.git
cd OpenPLC_v3
./install.sh linux
Start it up:
sudo ./start_openplc.sh
[Press Ctrl+C to stop it briefly while we install Docker].
Step 4: Installing "The Eyes" (FUXA via Docker)
Modern Industrial Edge Gateways run containerized applications. We will use Docker to run FUXA.
1. Install Docker
sudo apt install docker.io docker-compose -y

sudo usermod -aG docker $USER

newgrp docker
2. Fix Permissions (Crucial Step)
Docker often fails to write to database folders due to permission mismatches. We fix this pre-emptively to avoid the "Blank Screen" error.
mkdir -p ~/fuxa_scada/fuxa_data

cd ~/fuxa_scada

sudo chmod -R 777 fuxa_data
3. Generate Configuration
We use a Base64 command to generate the docker-compose.yml file. This prevents copy-paste indentation errors.
echo
"dHVyc2lvbjogJzMnCnNlcnZpY2VzOgogIGZ1eGE6CiAgICBpbWFnZTogZnJhbmdvdGVhbS9mdXhhO
mxhdGVzdAoJICAgcmVzdGFydDogYWx3YXlzCiAgICBvM3J0czoKICAgICAgICAgIC4gIC4gIC4gICAgLSAiMTg4MTo0ODgxgo
gICAgdm9sdW1lczoKICAgICAgICAgIC4gIC4gIC4gICAgLSAiL2F4ZGFzOGFyOTovdXNlL3NyY29hcHc2YydmVvL1l9Kyg=="
| base64 -d > docker-compose.yml
4. Launch FUXA
docker-compose up -d
Step 5: The Logic (Understanding Structured Text)
A PLC is useless without code. We need to upload a program that tells the PLC what to do. Create a file named pump.st and paste this code:
PROGRAM main
  VAR
    Pump_Switch AT %QX0.0 : BOOL;
  END_VAR

  (* Memory Latch: Keep the variable alive *)
  Pump_Switch := Pump_Switch;
END_PROGRAM

CONFIGURATION Config0
  RESOURCE Res0 ON PLC
    TASK task0(INTERVAL := T#20ms,PRIORITY := 0);
    PROGRAM instance0 WITH task0 : main;
  END_RESOURCE
END_CONFIGURATION
Why this code?
The line Pump_Switch := Pump_Switch; looks redundant, but it is critical. PLCs operate in a fast loop called a Scan Cycle. If we don't explicitly tell the PLC to "keep" the value of the switch, the PLC might reset it to FALSE (OFF) at the start of every cycle. This line acts as a memory latch, allowing our Modbus command from FUXA to persist.
Upload this file to the OpenPLC Dashboard (http://192.168.56.50:8080) and click Start PLC.
Step 6: Configuring the Digital Twin
Now we connect the visuals (FUXA) to the hardware (OpenPLC). Open FUXA at http://192.168.56.50:1881 and enter the Editor.
- Add Device: Go to Configuration -> Devices. Add "OpenPLC" at IP 192.168.56.50, Port 502. IMPORTANT: Enable the toggle switch on the right!
- Add Tag: Go to Tags. Add Pump_Status pointing to Address 1 (which maps to OpenPLC %QX0.0).
- Draw Switch: Go to Graphics. Drag a switch, bind it to Pump_Status, and add a "Click -> Toggle" event.
Step 7: Verification & Data Flow
Click Play in FUXA. Click the switch. The light should turn Green.
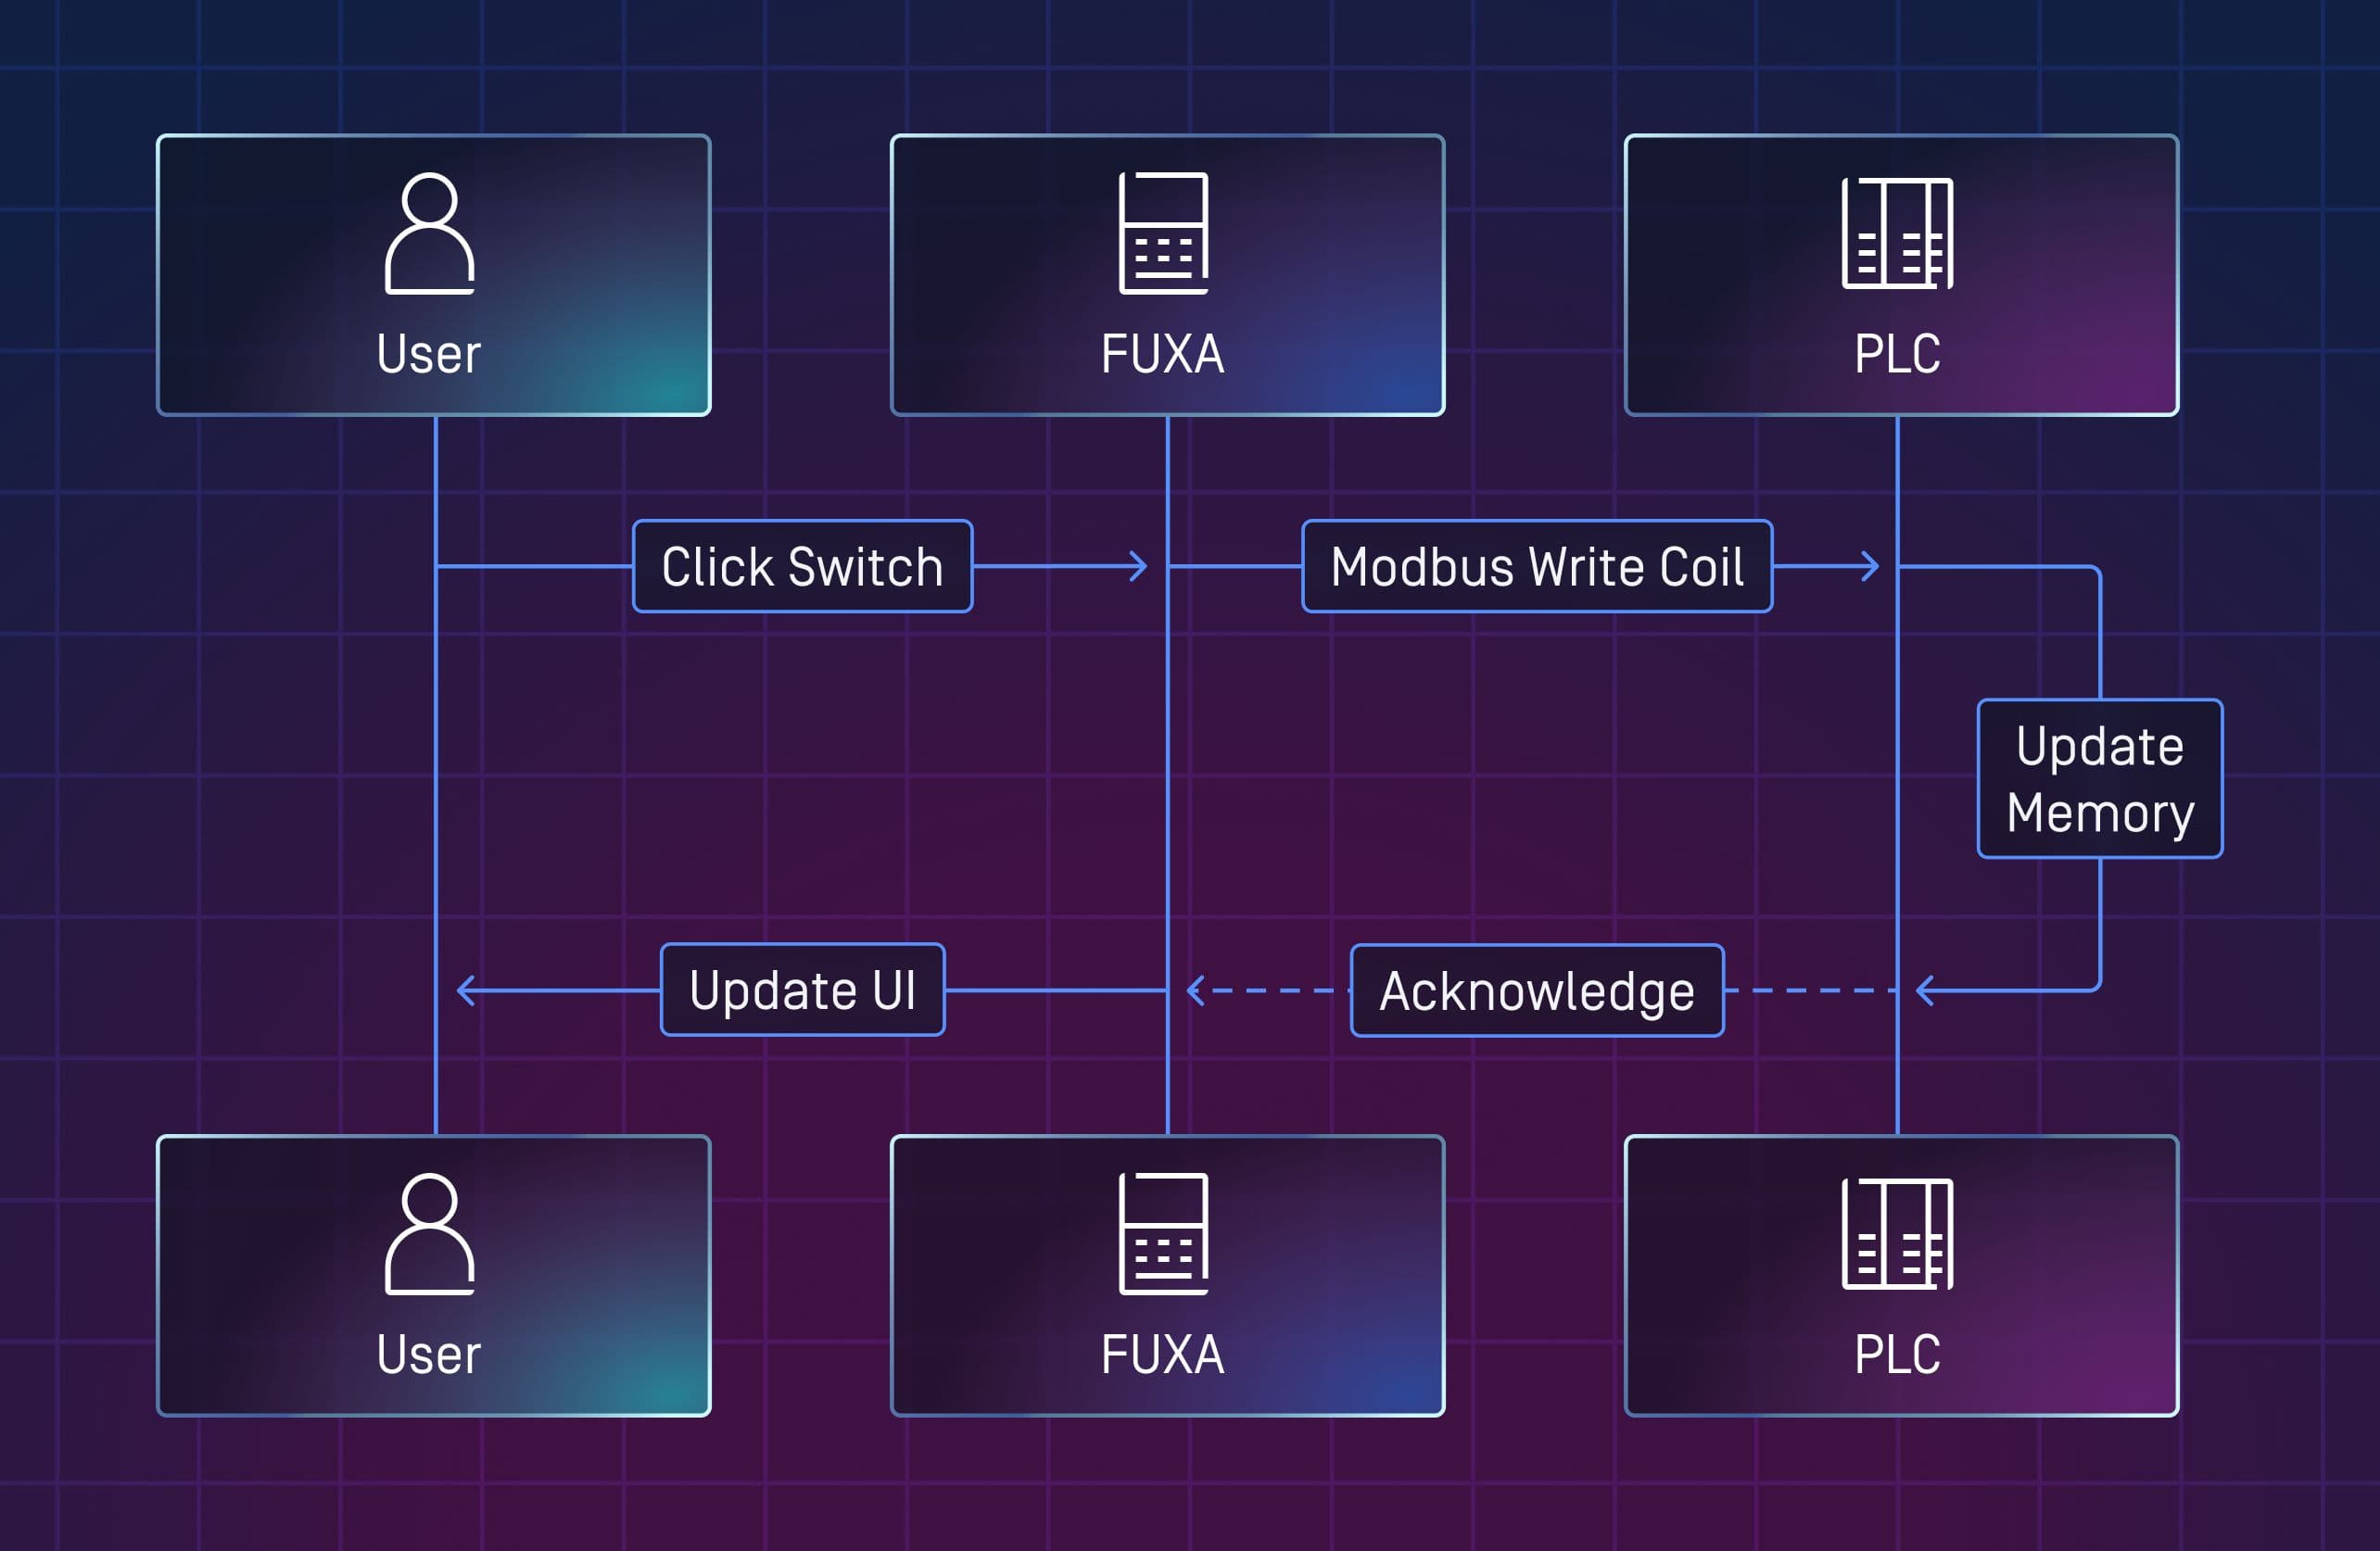
Here is exactly what just happened:
- Operator Action: You clicked the switch in your browser.
- Translation: The FUXA container translated that click into a Modbus TCP command.
- Network Transmission: A packet was fired across the network to 192.168.56.50 on Port 502.
- Execution: OpenPLC received the packet, updated memory address %QX0.0, and the Ladder Logic executed.
- Feedback: The PLC sent a confirmation back, and FUXA turned the light green.
Step 8: The Air Gap
Finally, we secure the lab. Go to VirtualBox Settings -> Network -> Adapter 1 and Uncheck "Cable Connected".
This simulates physically unplugging the factory from the internet. Your lab is now a secure, isolated island.
What's Next?
Now that we have a working factory, we need to inspect it. In the next part of this series, we will install Wireshark to capture the Modbus traffic and see exactly why this protocol is so vulnerable to hacking.


